Showing posts with label cooking. Show all posts

Tuesday, January 31, 2012

Lasagna ala Dyta

I've always wanted to try to make lasagna.. I knew the concept, but never had the time (or effort) to make it. So, I decided to make it last Sunday. I didn't browse any recipes this time, only created my own recipe..  Alhamdulillah it turned out nicely :).

Here's my recipe :

1. Meat Sauce


Meat Sauce
Actually this recipe is a modification of my mom's spagetti sauce recipe :
Ingredients :
1/2 kg Ground beef
3 large tomatoes and 1 carrot, blendered
250 gr Shredded Cheddar cheese
1 tbsp Tomato Sauce
1 tsp Tomato Paste
Half an Onion, chopped
2 cloves of garlic, minced
Olive oil and butter
2 bayleaves
1 tbsp oregano
1 tbsp blackpepper
salt and sugar to taste

Directions :
Saute the onions until golden brown, add in garlic, stir for a couple minutes. Add the ground beef, cook till color changes, add a little water. Add tomato sauce, tomato paste, bay leaf, tomato&carrot juice, and all the other ingredients, cook until meat is tender and the sauce is thickened in a low heat.

2. Cheese Sauce also known as Beschamel Sauce
Cheese Sauce
Ingredients :
250 ml fresh full cream milk
250 gr cheddar cheese
Canned mushrooms (optional)
1 tbsp cornstarch
Half an onion, chopped
2 cloves of garlic, minced
Olive oil and butter
1 tbsp blackpepper
Salt to taste

Directions :
Saute the onions and garlic, add in the cornstarch stir through until dissolved. Add the mushrooms, stir until cooked, then add milk, cheese, and other ingredients. Cook in a low heat until sauce thickens.

3. Cook Lasagna as in the direction in the box til al dente.

4. Assembly the lasagna in a heatproof pan, starting with a layer of lasagna, meat sauce, cheese sauce, lasagna, over and over until all the ingredients are finished, topped with the cheese sauce, and sprinkled with more cheddar or mozzarella cheese.
Assembly the Lasagna

5. Bake the lasagna in a preheated oven of 180 C, for about 35-40 minutes, or until cooked through.


Bake in a preheated oven

Garnish the Lasagna, Ready to eat..:D


6. You should wait a couple of minutes (or until the lasagna is cooled down) before you cut the lasagna, or else it wil turn out runny.

The Layers of My Lasagna

Choco Lava Cake a.k.a Chocolate Foundant

Weekend is cooking day for me.. So last Saturday I decided to make a choco lava cake. So I searched the internet, and found this recipe. The owner of the blog said this is Gordon Ramsay's Recipe, so if my cake turned out bad, blame it at Gordon.. haha..

Here area the steps :

First, melt the butter and chocolate ini a hot pan on top of a sauce pan filled with boiling water. Stir the chocolate and butter until all is melted and combined. Be careful not to let the chocolate mix boil. Set aside, and let it cool.


   Whisk the eggs with an electric mixer in  high speed til pale and stiff, pour in chocolate mixture, and mix it well using a spatula. Add the flour a little by little, and keep folding the mixture with the spatula until the mixture is combined through.

This is how it will look..

Prepare the ramekins (i don't have any ramekins, so I use cupcake pans) by spreading each with butter and dusting it with cocoa powder.


Pour in the chocolate mixture, about 3/4 of the height.


   Put in a preheated oven about 180 C, for about 10-12 minutes (depends on the oven, my oven took about 25 minutes). 


You'll know if it's ready if you poke the side of the cake with a small stick and none of the mixture sticks.
 Last but not least, garnish your cake with whipped cream or ice cream and fruits as you like..
Tada! Chocolate Lava Cake is ready to eat.. Nyum Nyum!!

Tuesday, January 24, 2012

Bake A Cake

Hey there, how was your long weekend? Did anything special? Well I decided to once again test my cooking skills by making a cake.. haha.. The cake i chose to bake was a tiramisu.. Since this is my first time baking, i have to buy some baking necessities like :

  1. Mixer
  2. Oven
  3. Spatula's
  4. Large bowl
  5. Baking pan
So, i convinced hubby to take us to Palembang, to buy all my needs and just to take a break from the small city..haha..

Coz this is my first time to bake, and dunno if i'm good at it,  i just bought a middle quality mixer, a Miyako brand. Hubby said that i should buy a philips  but i thought, nah, probably later when i became good at baking, i"ll ask hubby to buy me a new sophisticated mixer haha..

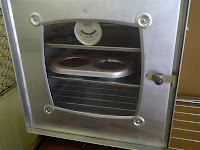
As for the oven, i chose a traditional stove oven, coz it's more cheaper with the gas. The price of an electrical oven is that much different with a stove oven, but it's a lot more expensive on the electricity (high watt).

So, with high spirit i started baking my cake with hopes too..

In the end, it turn out pretty nicely..:). Hubby said presentation wise, i get a 9, taste wise, hhmm.. needs some improvement..haha.. The texture of the cake wasn't as "full" and a bit too fluffy, but i think it tastes pretty good..haha.. Well, at least Kia likes it..:D.


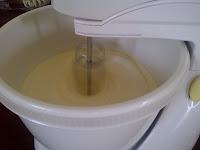
Caking in d making..:D

Tada! My yummy cake..slurp!!

Tuesday, January 17, 2012

Making Pizza (Warning : Not As Easy As It Seems)

So, last Saturday I decided to make pizza. The idea came from Tomoko, my neighbor who likes to bake all kinds of cake and pastry. So I searched the internet and found this pizza dough recipe and this pizza recipe. After reading the steps over and over again, I thought, "ok, this is gonna be a piece of cake".

So, i went to the shop to buy the ingredients. This is what I bought for my pizza recipe :

  1. Wheat Flour
  2. Instan yeast
  3. Ketchup (tomato sauce)
  4. Sugar and salt
  5. Sausages
  6. Canned Mushrooms
  7. Greenbell Peppers
  8. Ground beef
  9. Onions
  10. Chedder cheese (prefer mozzarella, but theres none in Prabu..*cry*)
  11. Garlic
  12. Olive Oil
Kia Helping Me With The Dough :D
The first step was making the dough. It's a little hard to determine when the dough was ready, coz it always seemed too sticky, no matter how much flour I added. Well, at the end, it turned out like this.. (after an hour, it rose up) :


The Pizza Dough After It Rose Up

Meanwhile waiting for the dough to rise up, i prepared the toppings. First of all, I prepared the ground beef, here's what i did :
  1. Cut the onions into small bits, and also chopped the garlic.
  2. Sautee the onions first with a little bit of olive oil then toss in the garlic. Stir until both are caramelized and turn brownish gold.
  3. Then add the ground beef, continue stirring until the beef is cooked and all the juices come out. You can add a little bit of water to prevent from burning.
  4. Then last but not list season it with salt and black pepper.
Besides the ground beef, all the other toppings i just cut into smaller pieces. Here's a look at my toppings :

The Toppings

After and hour, my dough has risen, so it was a sign that it was ready. So I took about a half of the dough, then started to spread it out on a plate, put on the toppings, and tad a! This is what it looks like..:)

Right Before Tossing it In The Microwave
Daddy Making His Own Pizza


Yup, so i thought so far so good, everything is right on track, now's the time to bake the pizza..yay!

Pizza Baking in the Microwave, smelling yum yum!

The problem is, I don't have an oven, but I do have a microwave. So I thought, "what's the difference?". Despite of what hubby said that it won't work, me being stubborn as I am, still continued the process, and cooked the pizza in the microwave. When it cooked, the aroma was so delicious I was so confident with my pizza.. And this is how it turned out :

My So Called Pizza..:D *still yummy though!*

What?!! The toppings were all burnt, but the pizza dough wasn't  cooked enough. No no no!! Argh.. How could this be??! So, I went too check the internet again, searched for "Cooking Pizza With A Microwave". Turns out that hubby was right, you can't cook pizza with a microwave, unless you want your pizza dough too turn out all gooey... hhmm..

Oh well, at least I got a lesson learnt.. And the pizza actually tastes good too.. LOL..*self defense*

Next Project : Making Tiramisu Cake
Must Have List : Oven, mixer, measuring scale